Learning how to make ravioli at home is part cooking, part craft—and incredibly rewarding once you find the rhythm. This step-by-step guide shows you how to roll, fill, seal, and cook ravioli so they hold together, cook evenly, and work with a wide range of fillings.

Making ravioli at home is a structured process made up of a few clear stages: rolling pasta dough, adding filling, sealing it properly, and cooking it gently so the ravioli hold their shape. When each step is handled with intention, the result is consistent, well-sealed ravioli with tender dough and an even filling.
The method here uses a pasta roller and a ravioli mold to keep spacing, thickness, and sealing consistent. We’ll cover how thin to roll the dough, how much filling to use, how to prevent bursting or leaking, and how to cook ravioli so the dough stays tender without tearing. Once you understand the flow, you can apply it to any filling you like.
Getting Started: What To Expect
If you’re new to ravioli, the hardest part isn’t technique—it’s managing the workflow. Ravioli comes together best when you treat it like a small assembly line: dough resting while you prep filling, dough sheets rolled while the first batch is being filled, and finished ravioli resting while the water comes up to a steady simmer.
Plan on about 60–90 minutes start to finish the first time (faster once you’ve done it once), plus extra time if you’re making dough from scratch. You’ll want a clean, lightly floured surface, a towel or plastic wrap to keep dough from drying out, and one “landing zone” (a sheet pan with parchment and a dusting of flour/semolina) for finished ravioli so they don’t stick.
Quick Overview: How to Make Ravioli
- Make or prep your dough: Use a rested pasta dough (homemade or store-bought sheets). Keep it covered so it doesn’t dry out.
- Make your filling: It should be cool and fairly dry—wet filling is the #1 cause of leaks and torn seals.
- Roll dough into sheets: Thin but sturdy (you should see your hand faintly through it, without it feeling fragile).
- Fill & seal: Use a small, consistent amount of filling and press out air as you seal to prevent blowouts.
- Cut & rest: Cut ravioli and let them sit 15–60 minutes so the surface dries slightly and the seals set.
- Cook gently: Simmer in well-salted water until they float, then give them another 1–2 minutes. Lift out with a slotted spoon.
- Freeze (optional): Freeze in a single layer first, then bag. Cook straight from frozen with 1–2 extra minutes.
How To Make Ravioli From Scratch
Making homemade ravioli from scratch isn’t just about the end result (though yes—biting into a tender, well-filled pasta pocket is a win). It’s about the process: rolling dough thin enough to feel delicate but not fragile, adding filling with intention, and sealing each piece so it holds together in the pot. It’s hands-on in a satisfying way—somewhere between a craft project and a cooking skill you learn once and keep forever.
To get there, we’re working with a pasta roller (or small rolling pin), a ravioli mold, and a steady rhythm. The mold takes the guesswork out of spacing and sealing, which makes the process more consistent—especially if you’re newer to ravioli or want reliable results batch after batch. The goal is smooth, elastic dough that rolls evenly, fits cleanly into the mold, and seals without tearing.
Below, we’ll walk through each stage in order: preparing and resting the dough, rolling it to the right thickness, filling and sealing with a mold, and cooking ravioli so they stay intact and tender. Once you understand the flow, the process becomes easier to do—and far less intimidating than it looks.

Essential Equipment for Making Ravioli
You don’t need a professional pasta setup to make ravioli, but having the right tools on the counter before you start makes the process smoother—and far less stressful. This method is built around a ravioli mold, which removes a lot of the guesswork and helps you get consistent, well-sealed ravioli every time.
- Pasta roller (or small rolling pin) – A pasta roller makes it much easier to roll dough evenly and thin without tearing. If you don’t have one, a small rolling pin works—but you’ll want to take your time and check thickness often. Even sheets are the goal here; they should be thin enough to flex without tearing.
- Ravioli mold – Using a ravioli mold removes a lot of the small decisions that make ravioli feel intimidating—how much filling to use, how far apart to space it, and where to press to seal. The result is more consistent ravioli with fewer mishaps, like the ravioli opening or leaking during cooking.
- Bench scraper – Helpful for portioning pasta dough into manageable pieces and keeping your work surface clean. A quick scrape clears excess flour and sticky dough bits without tearing the dough or stretching it out of shape.
- Small spoon or piping bag – Use a consistent amount of filling for each cavity. A teaspoon gives you good control; a piping bag is faster and cleaner, but not essential.
- Small rolling pin – Used even if you have a mold—this is what presses and seals the top sheet evenly.
- Fluted pastry cutter or sharp knife – The ravioli mold creates sealed outlines, but you’ll still need to separate the ravioli. A fluted cutter gives clean edges and a classic look, but a sharp knife or pizza cutter works just as well.
- Clean kitchen towel or plastic wrap – Rolled dough dries out quickly. Keeping sheets covered while you work is key to clean seals and smooth edges.
Once everything is laid out and within reach, the process becomes assembly-line steady—which is exactly what you want when working with fresh pasta.
Rolling Out the Dough
Rolling the dough evenly is one of the most important steps in making ravioli that seal well and cook evenly. You’re aiming for dough that’s thin enough to feel delicate, but still strong enough to hold filling and withstand gentle boiling.
Start with a rested pasta dough—either your own or store-bought. If you’re making it from scratch, this method works especially well with my vegan ravioli dough—an egg-free dough that rolls smoothly and seals well in a mold.

Start with rested dough
Divide the dough into manageable pieces—usually quarters— and keep the pieces you’re not working with covered so they don’t dry out. Lightly flour your work surface and the dough, using just enough to prevent sticking without coating it heavily.


Begin rolling at the widest setting
If you’re using a pasta roller, begin at the widest setting. Run the dough through once, then fold it in half and run it through again. Repeat this a few times to smooth the dough and build structure.

Roll it gradually thinner
Move through the roller settings one at a time until the dough is about 1/16-inch thick. Roll the dough thin enough that you can see the outline of your hand through it, but thick enough that it lifts cleanly without tearing or stretching out of shape.
Dough Tip
If the dough resists rolling or snaps back, pause and let it rest for a few minutes. That usually means the gluten needs a moment to relax. If it starts sticking, dust lightly with flour and continue.
Keep sheets covered
Once rolled, lay the sheet flat and keep it covered while you roll the remaining pieces. Even thickness across the entire sheet matters more than getting it ultra-thin—uniform dough is what allows the ravioli mold to seal cleanly and consistently.
When all your sheets are rolled, you’re ready to move on to filling and sealing.

Filling and Sealing the Ravioli
This is where everything comes together. Once the dough is rolled and the filling is ready, the process shifts from preparation to assembly—and the ravioli start to take shape.

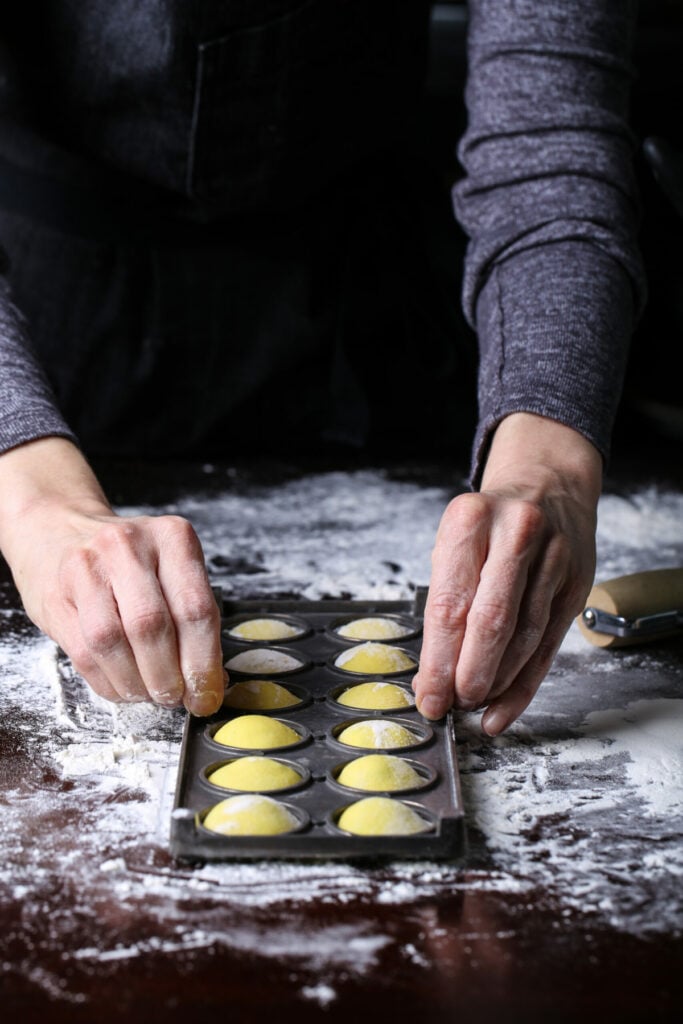
Give the ravioli mold a generous flouring. Lay one sheet of dough over the mold, then use the plastic tray it comes with to gently press the dough into the cavities. You want the well to be defined without thinning the dough too much—the surface should still feel sturdy.

Add the filling using a small spoon or piping bag, keeping the amount consistent. Aim for about a teaspoon per cavity. Overfilling is the most common reason ravioli fail later, so resist the urge to overstuff them. The filling should sit comfortably inside the well with space around the edges for sealing.


Lay a second sheet of dough over the top. Starting at one end, press your fingers over the top to help seal and push out any trapped air. Air pockets expand during cooking and can cause ravioli to burst, so this step matters.

Use a small rolling pin to roll firmly across the surface of the mold. This presses the two layers together and defines the seams.

Once sealed, pull the perforated edges away from the mold.
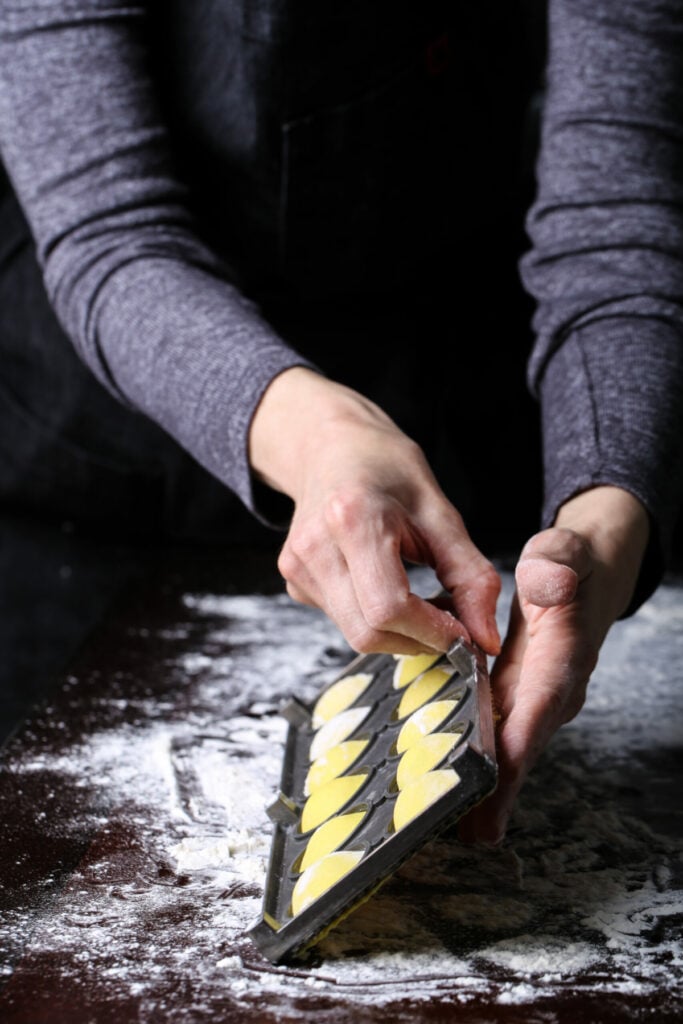

Then, invert the mold and gently release the ravioli onto a lightly floured surface.

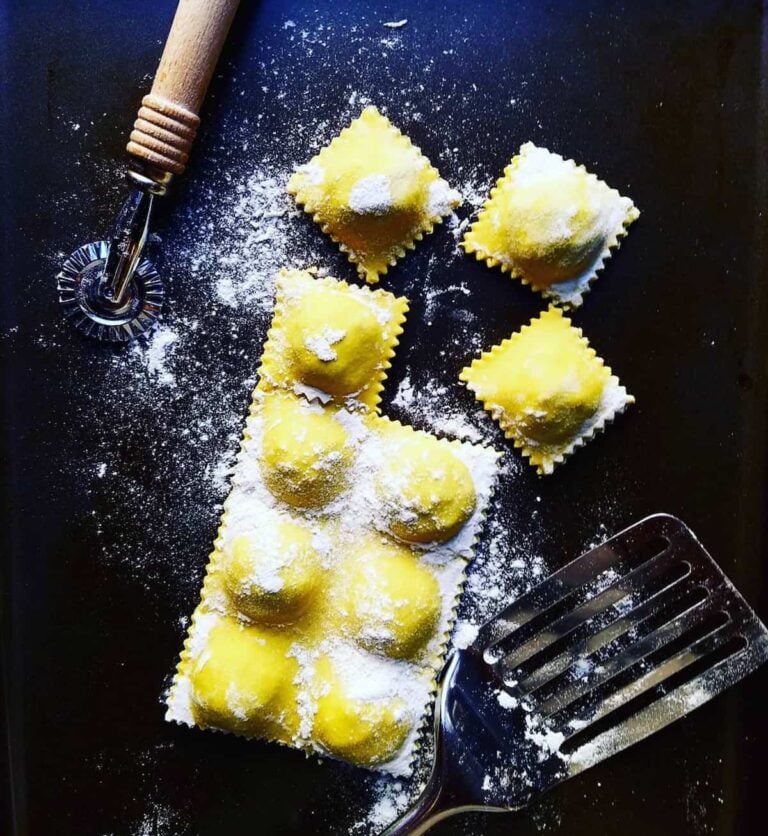
Use a fluted pastry cutter to cut the ravioli along the perforated edges.

Transfer the finished ravioli to a parchment- or silpat-lined baking sheet in a single layer. Let them rest for 15–60 minutes before cooking or freezing. This short rest allows the surface to dry slightly and helps the seals hold once they hit the water.
Once you’ve completed one tray, repeat with the remaining dough and filling. After the first batch, the rhythm settles in.
Cooking the Ravioli
Fresh ravioli cook quickly and don’t need aggressive heat. The goal is gentle movement, even cooking, and lifting them out before the dough softens too far.
Bring a large pot of water to a steady simmer—not a rolling boil—and salt it well (about 1 tablespoon kosher salt per 4 quarts of water). The water should taste like the sea; this is what seasons the pasta itself. Ravioli are delicate, and aggressive bubbling can stress the seams you just sealed.
Lower the ravioli into the water in small batches, so they have room to move. Stir once, gently, right after adding them to prevent sticking. Within a couple of minutes, they’ll rise to the surface. Once they float, let them cook for another 1–2 minutes until the dough is tender but still structured.
Use a slotted spoon or spider to lift the ravioli directly into a warm sauce or onto a serving platter. Avoid dumping them into a colander—the force of draining can tear the seams.
If you’re not serving immediately, spread the cooked ravioli in a single layer and lightly coat with sauce or olive oil to prevent sticking. Fresh ravioli are best eaten right away, while the dough is supple and the filling is still warm.
Freezing and Storing Ravioli
Homemade ravioli freeze exceptionally well, which is part of what makes the process worth the time. A short pause before freezing and a simple setup help prevent sticking, tearing, or soft edges later. This is a batch-friendly process: make a full tray now, freeze what you don’t need, and future dinners get a lot easier.
Once the ravioli are cut and sealed, arrange them in a single layer on a parchment- or silpat-lined baking sheet. Make sure they aren’t touching. Let them sit at room temperature for about 30–60 minutes until the surface feels slightly dry. This helps the dough hold its shape and keeps the ravioli from sticking once frozen.
Transfer the tray to the freezer and freeze until the ravioli are solid, usually 1–2 hours. Once frozen, move them to a freezer bag or airtight container. Label with the date and filling if you’d like. Ravioli keep well for up to three months.
To cook frozen ravioli, do not thaw. Drop them directly into gently simmering, well-salted water and cook until they float, then give them another 1–2 minutes before lifting them out. Cooking from frozen helps protect the seal and reduces the chance of the filling softening into the dough.
If storing fresh (not frozen) ravioli, keep them in a single layer in the refrigerator, lightly dusted with flour and loosely covered. Use within 24 hours for the best texture.
Common Mistakes & Troubleshooting
Ravioli issues usually come from a small mismatch between dough thickness, filling amount, or handling. Here’s how to diagnose and fix the most common issues.
- Ravioli bursting while cooking: This almost always comes down to overfilling or trapped air. Use a modest, consistent amount of filling and press gently around each cavity as you seal. This helps the ravioli hold their shape as they cook.
- Edges not sealing cleanly: If the dough feels dry or overly dusted with flour, the layers won’t bond well. The dough should feel pliable, not chalky. Brush away excess flour before sealing. If the dough has started to dry, a very light touch of moisture can help—but flour control matters more than added water.
- Dough tearing in the mold: This usually means the dough was rolled too thin for filled pasta. You should be able to see your hand faintly through the sheet, but it should still lift without stretching or tearing. If it feels fragile, fold the sheet in half and run it through the pasta machine one more time to strengthen it before continuing.
- Ravioli sticking to the mold or surface: Under-flouring is the culprit here. Flour the mold generously before laying down the dough, and dust the finished ravioli lightly before resting. If the dough sticks to your work surface, don’t pull—lift gently with a bench scraper to avoid tearing.
- Gummy or mushy texture after cooking: Fresh ravioli cooks quickly. Once they float, they’re close to done. Keep the water at a gentle simmer and lift them out after another minute or two, while the dough is tender but still holds its shape.
If something goes wrong mid-batch, pause and adjust. This process rewards small corrections, and the next tray is bound to be better than the first as you become familiar with the process.
Serving Ravioli
Fresh ravioli don’t need much to feel complete. The dough is tender, the filling is already seasoned, and the goal is to support—not cover—that work.
Light sauces work especially well here. A simple tomato sauce with good acidity, a white wine and olive oil sauce, or a light cream-based sauce will coat the ravioli without overwhelming them. If you’re keeping it minimal, warm olive oil with a little sautéed garlic and cracked black pepper is enough.
Finish with fresh herbs, a small dollop of vegan ricotta, or a small handful of toasted nuts for texture if you’d like. Serve right away, while the pasta is supple and the filling is still warm.

Related Ravioli Recipes & Guides
- Vegan Ravioli Guide (Best Recipes & Brands)
- Vegan Ravioli (With Plant-Based Sausage)
- Vegan Ravioli With Cashew Cheese Filling
- Homemade Pumpkin Ravioli
I hope this step-by-step guide on how to make ravioli helps clarify the process. If you have any questions, feel free to leave them in the comments.
This article was originally published in 2023 and updated in 2026 using clarified instructions and troubleshooting tips.